How to Extend Your Coils Lifespan When Vaping
Vaping technology has come a long way, and coils are now more efficient than ever. But regardless of innovation, coils have a limited lifespan. It’s a real pain (and expense) when a coil burns out too quickly, leaving you with disappointing flavour and unpleasant hits. The good news is there are plenty of simple, effective ways to preserve coil life. By making a few tweaks to how you vape and care for your equipment, you can ensure every coil goes the distance.
In this guide, Select Vape Club will walk you through practical hacks to boost coil longevity, save money, and keep your vape experience consistently delightful. Whether you’re brand-new to vaping or have years of sub-ohm experience, these tips will help you get the most out of every coil in 2025 and beyond.
1. Choose the Right E-Liquid for Your Coil
a) Beware Excessively Sugary E-Liquids
One of the biggest coil killers is excessive sweetener in e-liquids. Flavours such as dessert, candy, or some fruity blends can contain higher sweetener content. While these flavours are undeniably tempting, sweeteners tend to caramelise on the coil, leading to residue build-up that can drastically shorten coil life.
Tip: Look for e-liquids labelled as “coil-friendly” or “low sweetener.” If you have a sweet tooth, rotate in less sugary flavours to give your coil a breather.
b) Mind the PG/VG Ratios
Vegetable Glycerine (VG) is thicker and can produce large, dense clouds, but it can also gum up coils if you’re using a device not designed for high-VG e-liquid. Propylene Glycol (PG) is thinner, delivers a stronger throat hit, and generally keeps your wick more efficiently saturated.
-
Sub-ohm coils (below 1.0 ohm) typically do well with 70VG or higher.
-
Mouth-to-lung (MTL) coils often need a 50/50 PG/VG blend to avoid premature burnout.
Choosing an e-liquid ratio that matches your coil’s recommended range helps maintain optimal wicking and prevents dry hits.
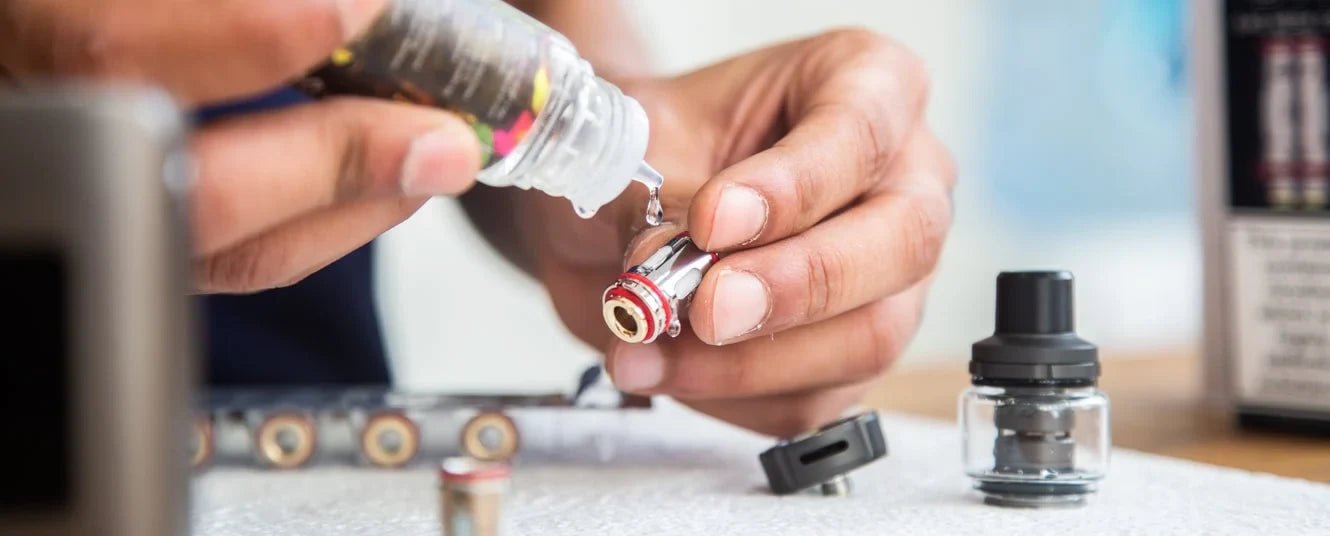
2. Properly Prime Your Coils
No matter how advanced coils get, improper priming remains a top reason for coil burnout. Priming is the process of saturating the wick with e-liquid before you begin vaping. Skipping or rushing this step can result in scorching your coil from the first puff.
a) Drip E-Liquid Directly Onto the Coil
Take the new coil out of its packaging and locate the exposed cotton sections or wick ports. Drop a few drops of e-liquid onto the cotton. Watch for absorption—if it soaks in quickly, add a little more.
b) Allow a Standing Period
Install the coil, fill your tank or pod with e-liquid, and let it sit for at least 5–10 minutes. During this period, the wick fully absorbs the liquid, reducing the risk of dry hits and extending coil life.
c) Start at Lower Wattages
When you power up for the first time, begin at a lower wattage than normal. Take a few gentle puffs, then slowly increase wattage to your preferred level. This gradual approach helps the coil break in without stress.
3. Adjust Your Wattage Wisely
Running your device at extremely high wattages (beyond the coil’s recommendations) may produce massive clouds—but at the cost of coil lifespan. If you notice a burnt or overly warm taste, your wattage is likely too high.
a) Check Coil Guidelines
Most coils list a recommended wattage range on the coil itself or on its packaging. Aim to operate within that range, perhaps slightly below the maximum rating if you’re looking to preserve your coil.
b) Fine-Tune Gradually
Rather than jumping from 20W to 40W, increase by small increments of 1–5 watts. This method helps you gauge when you’ve hit the sweet spot for flavour, vapour, and coil preservation.
c) Consider Temperature Control
If your mod supports temperature control (TC) and you have compatible coil materials (like stainless steel, nickel, or titanium), TC can help prevent dry hits. By setting a maximum temperature, you avoid overheating the coil.
4. Avoid Chain Vaping on Fresh Coils
Chain vaping is the practice of taking multiple puffs back-to-back with little to no break in between. Doing this right after installing a new coil can cause the wick to dry out before it’s fully saturated, leading to early burnout.
a) Pace Your Puffs
Especially on a new coil, allow at least 15–30 seconds between hits to let the wick re-saturate. Once the coil is well broken-in, you can indulge a bit more without risking damage.
b) Monitor Flavour Changes
If you notice a slight dip in flavour or a hint of dryness, set your vape down for a moment. Those are early warning signs your wick is drying.
c) Keep E-Liquid Levels Above the Wick Ports
When your tank or pod dips too low, the wick ports may not be fully immersed in e-liquid. Regularly top up to maintain proper saturation.
5. Clean Your Tank, Pod, and Drip Tip Regularly
Gunky residue builds up over time, even with high-quality e-liquids. This build-up can work its way into your coil, causing restricted airflow, muted flavours, and eventually, coil damage.
a) Simple Tank or Pod Rinse
-
Step 1: Disassemble your tank (remove the coil, O-rings, and drip tip). For pods, simply remove the coil if possible.
-
Step 2: Rinse each part under warm water (except the coil) to clear out leftover e-liquid or debris.
-
Step 3: Dry thoroughly with a paper towel or let components air-dry before reassembly.
b) Periodic Deep Cleans
Every few weeks, consider using warm, soapy water (or a little bit of vodka/lemon juice solution) for a deeper clean. Rinse thoroughly to ensure no aftertaste remains.
c) Don’t Forget the Drip Tip
Your drip tip collects condensation, spitback, and bacteria. Give it a quick rinse every few days and wipe with an alcohol-based wipe if needed.
A cleaner tank and mouthpiece reduce the likelihood of residue building on your coil and keep every puff tasting fresh.
6. Manage Airflow and Inhale Technique
Airflow directly affects how much e-liquid moves through your coil. If you enjoy restricted airflow, you might be pulling a lot more liquid onto the coil with each draw, causing it to burn hotter.
a) Dial in Your Airflow Ring
Most tanks have an adjustable airflow ring. Experiment with slightly more open airflow to keep the coil cooler and reduce the risk of burning. If you prefer a tighter draw, keep an eye on your coil’s condition and adjust your wattage accordingly.
b) Gentle but Steady Draw
Overly aggressive inhaling can flood your coil (leading to gurgling or leaks). Conversely, weak inhales might not pull enough e-liquid into the wick. A balanced, steady inhale is best for coil longevity.
7. Steer Clear of Excessive Sweeteners
We touched on sugary e-liquids already, but it’s worth reiterating: too many sweeteners wreak havoc on coil lifespan. They caramelise on the coil and wick, leaving sticky residue and inhibiting efficient wicking.
a) Rotate Flavours
Rather than vaping dessert flavours exclusively, consider interspersing fruit or menthol blends with lower sweetener content. This rotation gives your coil a break from the continuous sugar assault.
b) Look for “Clean” E-Liquids
Some premium brands design e-liquids with minimal sweeteners or synthetic sweeteners that don’t gunk up coils as quickly. They may still offer sweet notes, but without the same coil-killing effects.
c) Consider Unflavoured E-Liquid for Occasional Breaks
Unflavoured or very lightly flavoured e-liquids can essentially cleanse your wick. While it might not excite your taste buds, a short break on a simpler juice can extend coil life.
8. Perfect Your E-Liquid Storage
Storing e-liquids improperly can degrade flavour or separate components in the bottle. In turn, you may experience inconsistent wicking or deposit more impurities on the coil.
a) Keep Bottles Cool and Dark
Sunlight and heat can accelerate oxidation of the nicotine and break down flavours, sometimes leading to a thicker or altered consistency. Store bottles in a drawer or cupboard at room temperature.
b) Shake Before Use
If an e-liquid sits for a while, PG, VG, nicotine, and flavourings can settle into layers. Give each bottle a gentle shake to re-homogenise the blend before filling your tank.
c) Watch the Expiry Date
E-liquids do have a shelf life—most are good for around 1–2 years. If it’s far past its best-by date, consider discarding or replacing to avoid potential coil problems (and off-tasting vapour).
9. Switch to Temperature Control (If Possible)
Not all vapers are fans of temperature control (TC), but it can be a helpful tool for preventing burnt coils. In TC mode, your mod monitors the coil’s temperature in real-time and automatically adjusts power to keep it below a set threshold.
a) Use Compatible Coil Materials
TC typically requires nickel (Ni), titanium (Ti), or stainless steel (SS) coils. Kanthal coils (common in many tanks) won’t work in standard TC modes.
b) Dial in Temperature Safely
Pick a comfortable maximum temperature (often between 180–230°C) and let the device regulate wattage. This reduces scorching and extends coil life, especially if you tend to chain vape.
c) Taste and Preference
Some vapers find the flavour slightly different in TC mode, while others love the consistency. It might be worth experimenting to see if it suits your taste buds.
10. Maintain Your Batteries and Device
A device providing inconsistent power can cause spikes in heat that fry your coil. Battery issues or mod malfunctions can lead to sudden changes in wattage or voltage.
a) Use High-Quality Batteries
Poor-quality batteries or batteries in bad condition may fluctuate in voltage output under load. Invest in reputable brands (e.g., Sony, Samsung, Molicel) and check them regularly for damage.
b) Keep Firmware Updated
If your mod is firmware-upgradable, occasionally check the manufacturer’s site for updates. Bug fixes and improvements can enhance device stability, indirectly helping preserve coil life.
c) Avoid Overcharging
Leaving your device plugged in overnight can shorten battery lifespan and potentially lead to power delivery inconsistencies. Whenever possible, unplug once fully charged and store batteries safely in a case (not loose in pockets or bags).
11. Clean or Replace Your Coil at the Right Time
Sometimes, you can extend coil life simply by cleaning it. This can work if the coil isn’t fully burnt and you just have some residue or gunk. However, once you notice a strong burnt taste, it’s usually time for a new coil.
a) Rinse with Warm Water or Soak in Alcohol
Remove the coil from the tank and gently rinse under warm water. Some vapers prefer soaking the coil in vodka or grain alcohol for a few hours to dissolve gunk, then letting it dry completely. This trick can add a few more days to a coil’s life.
b) Know Your Limits
A severely burnt coil won’t revive with cleaning—it’s time for a replacement. Pushing a coil too far leads to unpleasant tastes, possible health concerns, and frustration.
c) Keep Spares on Hand
Always have spare coils. If you’re trying to stretch out an old coil because you ran out, you might end up vaping unpleasant, burnt hits. It’s wiser to stock up, especially if your device uses a less common coil type.
12. Avoid Extreme Temperatures
Exposing your vape or e-liquids to very high or very low temperatures can cause the e-liquid to thicken or thin unpredictably. Thick e-liquid may not wick properly; overly thin e-liquid might flood the coil.
a) Don’t Leave Your Vape in the Car
Leaving your gear in a hot car in the summer or a freezing environment in the winter can degrade both batteries and e-liquids, stressing your coils in the process.
b) Warm Up Gently
If your e-liquid is cold and thick, let it warm naturally to room temperature. Avoid using direct heat sources to speed up the process.
13. Use the Right Tools and Accessories
Small things like the type of drip tip or the coil installation method can influence coil longevity. Even how you tighten your coil in the tank can matter.
a) No Over-Tightening
Screwing the coil too firmly can warp the metal or damage O-rings, leading to leaks or poor wicking. Tighten until you feel resistance, then add just a slight extra turn.
b) Keep an Eye on O-Rings
O-rings help maintain pressure balance in the tank. Worn or torn O-rings can cause leaks that lead to coil flooding. Replacing O-rings is easy and inexpensive.
c) Recommended Tools
A good vape toolkit might include small pliers, tweezers (ceramic if you ever need to pinch coils in rebuildable scenarios), and scissors. Proper installation ensures your coil sits snugly without air gaps.
14. Consider Pod Systems with Replaceable Pods
If you’re using a pod system, some pods come with non-removable coils, meaning you replace the entire pod when the coil burns out. These systems often use simpler coil designs, which can sometimes last longer if used at lower wattages.
a) Evaluate Cost
While pods can be more expensive than standalone coils, the convenience may be worth it. Some vapers find that pods’ sealed designs hold up better over time, minimising leaks.
b) Buy Genuine Pods
Counterfeit or off-brand pods might seem cheaper at first, but they often use lower-grade cotton or coil materials. This results in a shorter lifespan and poorer performance.
15. Rotate Between Multiple Flavour Profiles
Constantly vaping the exact same sweet or complex flavour can cause rapid coil build-up of residues. By switching e-liquids—especially to one that’s fruit-based or lightly sweetened—you can “reset” how your coil interacts with the juice.
a) Alternate Day-to-Day
Try using a dessert or sweet flavour one day and a fresher fruit or menthol the next. You’ll likely notice less coil gunk.
b) Shortfill Versatility
If you’re mixing shortfills with nic shots, try splitting your e-liquid into smaller bottles with different flavour blends. This can keep things interesting and reduce sweetener overload on your coil.
16. Don’t Let E-Liquid Run Too Low
When the e-liquid level drops below the coil’s wicking ports, the coil may begin pulling air instead of juice. This leads to partial dry hits or scorching.
a) Topping Up Early
Refill your tank or pod when you see the e-liquid approaching the wick holes, not after it’s already below them. This simple habit can do wonders for coil longevity.
b) Watch for Tilting
Certain tanks rely on gravity to help wick the coil. If you’re frequently tilting your device at odd angles or vaping horizontally, ensure the wick ports remain covered in e-liquid.
17. Take Breaks Between Vaping Sessions
It might be tempting to vape continuously throughout the day—especially if you switched from cigarettes and find vaping more enjoyable. But short breaks can significantly reduce the coil’s workload.
a) Prevent Heat Accumulation
Coils can retain heat, especially in sub-ohm devices. Brief pauses allow the coil to cool slightly, ensuring the wick doesn’t scorch.
b) Listen to Your Body
If you’re vaping simply out of habit, consider pacing yourself. You might find you enjoy the sessions more when you fully savour each puff.
18. Monitor Throat Hit and Flavour Quality
Your coil is a bit like the “canary in a coal mine” for your vaping experience. The moment flavour or throat hit changes dramatically, it’s time to investigate.
a) Keep Track of Coil Age
If you find your coil typically lasts around 1–2 weeks, make a mental or written note of the installation date. That way, you’ll know when you’re nearing the coil’s end.
b) Early Intervention
A slightly muted flavour or mild dryness doesn’t have to spell doom for the coil. Sometimes, cleaning or tweaking settings can restore performance.
19. Be Wary of Counterfeit Coils
Counterfeit coils are unfortunately not uncommon. They’re often made from inferior materials, meaning they’ll burn out faster and might pose safety risks.
a) Buy from Reputable UK Retailers
At Select Vape Club, we stock genuine, TPD-compliant coils and hardware to ensure you get the quality you pay for. Avoid suspiciously cheap deals on auction sites.
b) Verify Authenticity Codes
Many manufacturers print authenticity codes on packaging. If you’re unsure, scratch the label and check on the brand’s official website.
20. Know When It’s Time to Upgrade Your Setup
If you’re constantly burning through coils despite following all these tips, it might be time to reassess your device. Older tanks may not wick quickly enough for higher-VG liquids, or a worn-out mod might be delivering inconsistent power.
a) Modern Tanks with Mesh Coils
Mesh coils are known for their larger surface area, resulting in better flavour and typically longer lifespan. If your current tank uses older-style wire coils, an upgrade could save you money in the long run.
b) Pods with Improved Coil Technology
Many newer pod systems feature advanced coil technology designed for efficient wicking and reduced coil gunk. If you want simplicity without sacrificing coil life, consider a modern pod kit.
c) Sub-Ohm Upgrades
If you’re an enthusiast seeking big clouds, the latest sub-ohm tanks often feature superior airflow and coil longevity. Investing in a premium tank now can spare you constant coil replacements later.
Final Thoughts: Enjoy Longer-Lasting Coils, Save More Money
Coils may be an inevitable expense in vaping, but by following these practical, 2025-friendly tips, you can dramatically reduce how often you need replacements. From choosing e-liquids wisely to priming carefully, simple changes in habit can add days or even weeks to your coil’s life. Not only will you spend less on coils, but you’ll also enjoy better flavour, fewer burnt hits, and a consistent vaping experience every time you pick up your device.
At Select Vape Club, our goal is to keep you informed, satisfied, and excited about your vape journey. We stock a variety of quality coils, devices, and e-liquids—all carefully vetted to meet UK standards. Whether you’re after sub-ohm powerhouses or discreet pod systems, we’re here to help you find the perfect fit.
Ready to level up your vaping routine and say goodbye to prematurely burnt coils?
Visit Select Vape Club for expert advice, top-rated products, and deals that help you get more value out of every puff. Here’s to smoother, tastier, and more wallet-friendly vaping in 2025!