


vaporesso target PM30 vape kit
Regular price £22.99

Order within Calculating...

For delivery Calculating...

You could earn 5 reward points
Why Shop With Us?

Free UK Delivery on Orders above £25
Get it Tomorrow - Order Before 5PM
100k+ Verified Product Reviews
Best Vaping Rewards Programme
00500500
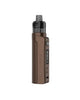

Specifications
| Feature | Details |
|---|---|
| Brand | Vaporesso |
| Product | Target PM30 Pod Kit |
| Dimensions | 117.1 × 22 × 26.7mm |
| Battery | Built-in 1200mAh rechargeable battery |
| Pod Capacity | 2ml / 3.5ml, depending on version |
| Output | 3-level adjustable wattage |
| GTX 0.6Ω Coil | 20–30W mesh coil |
| GTX 1.2Ω Coil | 8–12W regular coil |
| Charging | USB Type-C, 5V/1A |
| Display | 3-colour LED battery indicator |
| Pod Filling | Sliding top-fill Push To Fill system |
| Coil System | Replaceable press-fit GTX coils |
| Pod Connection | Magnetic connection |
| Device Type | Refillable and rechargeable pod system |
| Vaping Style | MTL and restricted DTL, depending on coil and setup |

1200mAh Built-In Battery

Three-Level Adjustable Wattage

GTX Coil Compatibility

Refillable Pod System

Easy Push To Fill Design

Magnetic Pod Connection
Colours

Blue Silk
Clean blue finish with a smooth appearance, offering a cool and modern colour option.
Carbon Stripe
Darker patterned finish with a sporty and bold appearance for users who prefer a more striking style.
Coral Red
Bright and lively warm red finish that gives the compact pod kit a noticeable appearance.
Grey Silk
Soft grey finish with a simple, understated look suitable for everyday use.
Jade Green
Fresh green finish that gives the Target PM30 a distinctive appearance while maintaining its neat, compact design.
Lavender Purple
Soft purple finish with a stylish appearance for users looking for an alternative to standard dark colours.
Opal White
Clean and bright finish that gives the Target PM30 a simple, fresh and minimal appearance.
What's in the Box?

What Makes Vaporesso Target PM30 Pod Kit Special?
How to Setup the Vaporesso Target PM30 Pod Kit
1
Check the Kit
Remove the Target PM30 device, pod, coils and Type-C charging cable from the box.
2
Install the Coil
Remove the pod from the device and push the compatible GTX coil firmly into the bottom of the pod. Ensure the notch is correctly aligned.
3
Fill the Pod
Slide the top cap open to access the Push To Fill port. Add suitable e-liquid carefully without overfilling.
4
Prime the Coil
When installing a new coil, allow the e-liquid to soak into the coil for around 5 minutes before vaping.
5
Attach the Pod
Place the filled pod back into the device. The magnetic connection should hold it securely.
6
Turn On the Device
Press the firing button five times quickly to turn the device on or off.
7
Choose the Power Level
Press the firing button three times quickly to cycle through the available power levels.
8
Start Vaping
Press and hold the firing button while taking a gentle draw. Do not fire continuously for more than 10 seconds at a time due to the device's cut-off protection.
Pros and Cons
Frequently Asked Questions
Recommended Products
Why Choose Select Vape Club
FREE UK DELIVERY
When you spend £25
UNBEATABLE PRICES
Explore our more vape deals
SECURED PAYMENTS
We accept all major credit cards.
7 DAYS ONLINE SUPPORT
We available via whatsapp chat


